
This one is a summary of my own experience with Sitecore Experience Commerce 10.1 Initial Release (aka Sitecore XC 10.1.0) installation on my machine. I’ve had much experience in the following ones:
- Sitecore XC9 installation
- Sitecore XC9 Update 1 installation
- Sitecore XC9 Update 2 installation
- Sitecore XC9 Update 3 installation
- Sitecore XC 9.1 Initial Release installation
- Sitecore XC 9.2 Initial Release installation
- Sitecore XC 9.3 Initial Release installation
- Sitecore XC 10 Initial Release installation
so I decided to go only with:
- XC Installation Guide for On Premises Solutions (Thanks Sitecore team!)
I hope this blog post is also helpful for your journey.
Note: personally, I wanted to use my own install directory rather than the default one
Setup Prerequisites
Please refer to the Sitecore Experience Commerce Compatibility Table for the software and version prerequisites:
- Windows 10
- ASP.NET Core Runtime 3.1.6 (or later) Hosting Bundle
- Sitecore Experience Platform 10.1 Initial Release
- Sitecore PowerShell Extensions 6.2 for Sitecore 10.1
- Sitecore Experience Accelerator 10.1
- Packages for On Premises WDP 2021.02-7.0.162
- Redis 3.0.504 or later
Step-by-step guide
- install the ones below if NOT YET

- a fresh Sitecore XP 10.1 Initial Release instance, let’s say storefront1010.local and storefront1010.xconnect.local (xConnect site)
- download and install ASP.NET Core Runtime 3.1.6 (or later) Hosting Bundle (Note: don’t forget to restart the OS)
- download and install Redis 3.0.504 or later
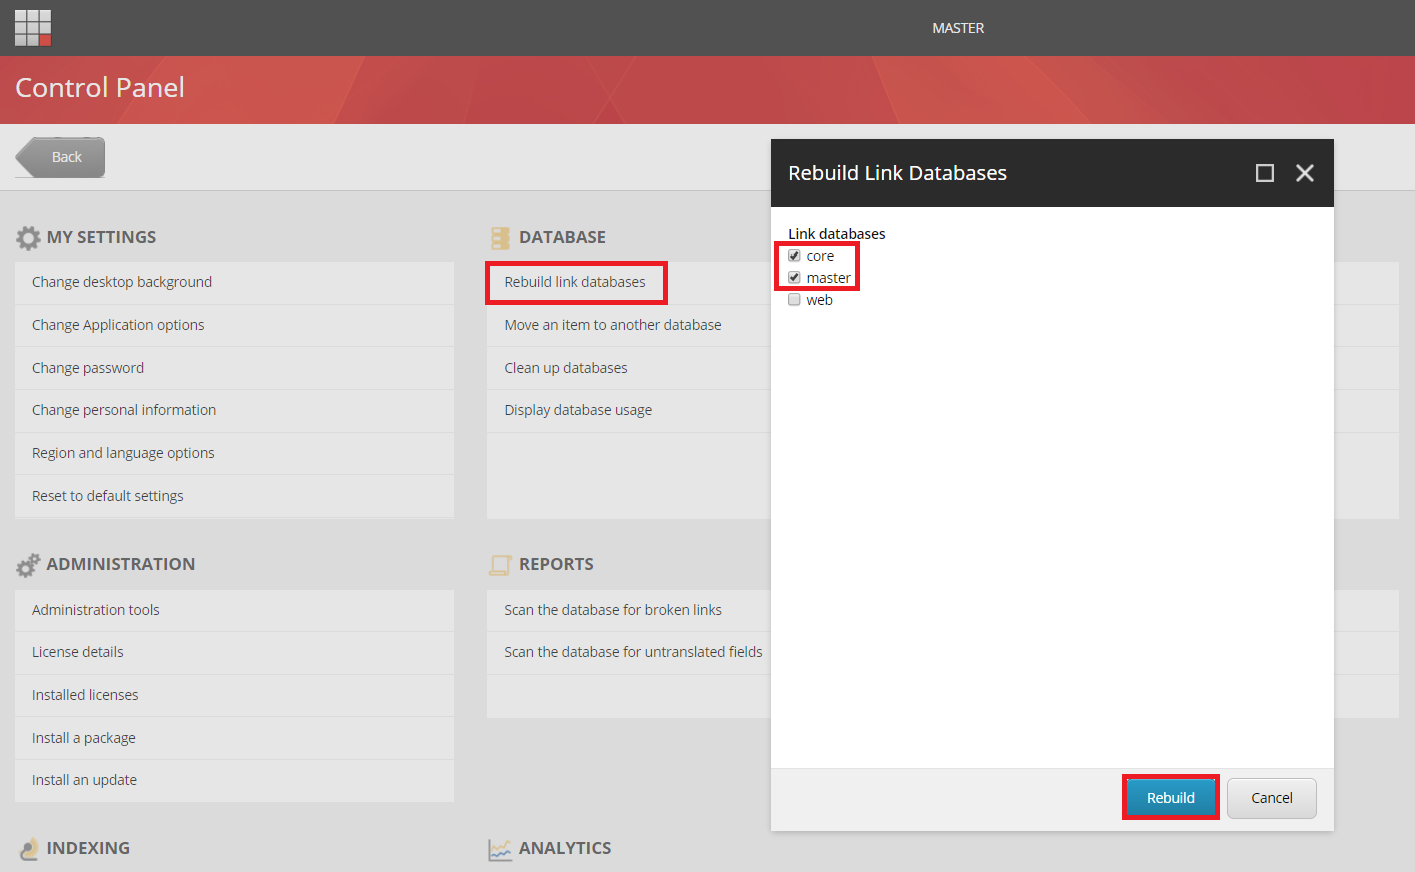
- rebuild the Link databases for the master and core databases if not yet:
- on the Sitecore Launchpad, click Control Panel, and in the Database section, click Rebuild Link Databases
- select the master and core databases and then click Rebuild
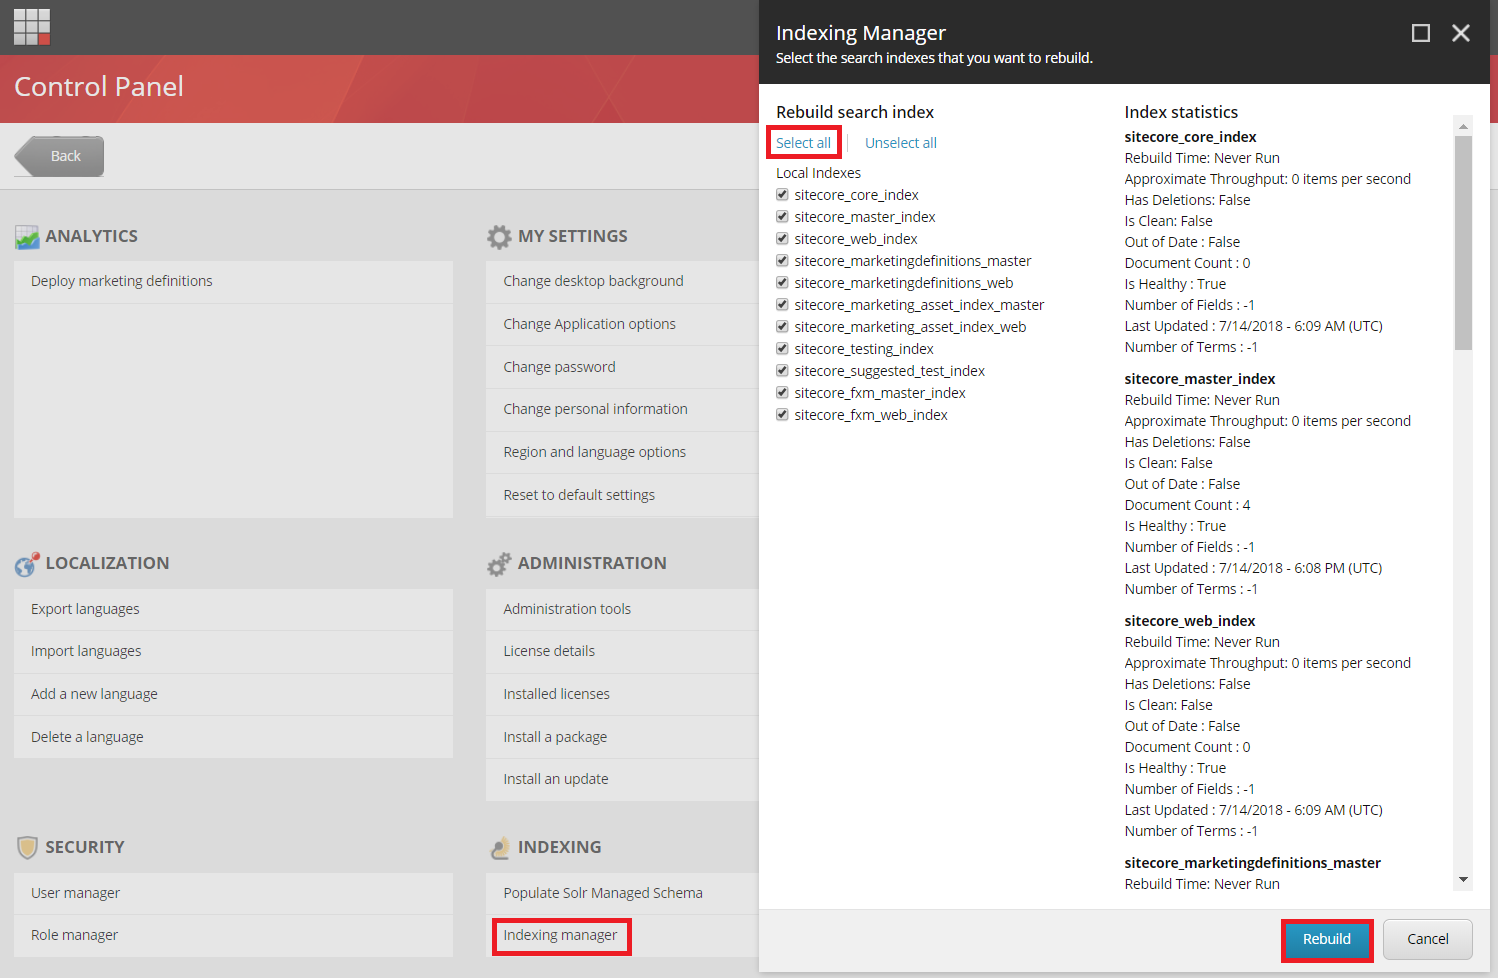
- rebuild the search indexes if not yet:
- on the Sitecore Launchpad, click Control Panel, and in the Indexing section, click Indexing manager
- in the Indexing Manager dialog box, click Select all, and then click Rebuild
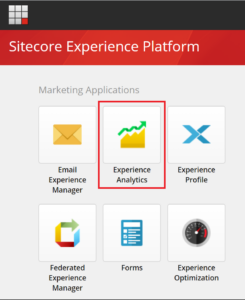
- ensure that Experience Analytics is working properly
-

- Note: if there is any error
- option 1: you will have to solve it before installing XC by opening the Sitecore log and then having a look at the error messages (normally, they’re certificate issues)
- option 2: you may want to disable xDB and then fix the error later after installing XC successfully
-
- create a new folder D:\sc1010_com_install
- download MSBuild Microsoft Visual Studio Web targets (available from Nuget) then extract the Web targets package, copy the tools\VSToolsPath\Web\Microsoft.Web.XmlTransform.dll file into D:\sc1010_com_install
- download Sitecore PowerShell Extensions 6.2 for Sitecore 10.1 and put it into D:\sc1010_com_install
- download Sitecore Experience Accelerator 10.1 and put it into D:\sc1010_com_install
- download and unzip Packages for On Premises WDP 2021.02-7.0.162 then put it into D:\sc1010_com_install
- unzip D:\sc1010_com_install\SIF.Sitecore.Commerce.6.0.18.zip and then rename to D:\sc1010_com_install\SIF for a better practice
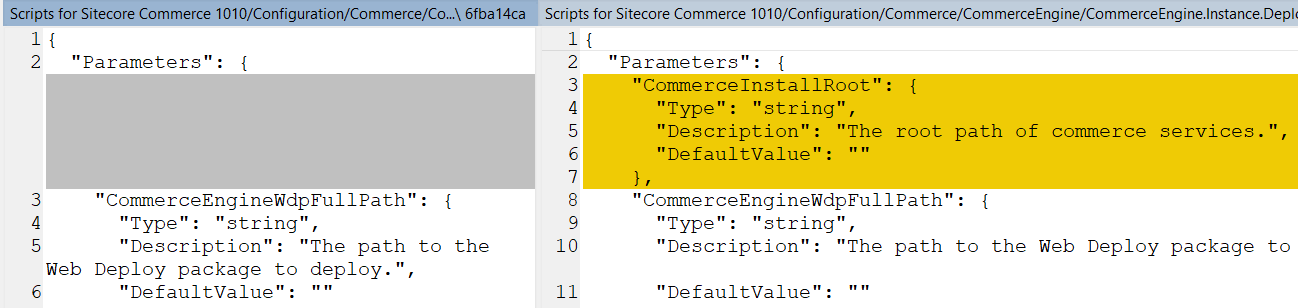
- override the following files in order to inject the custom install directory of Commerce’s sites
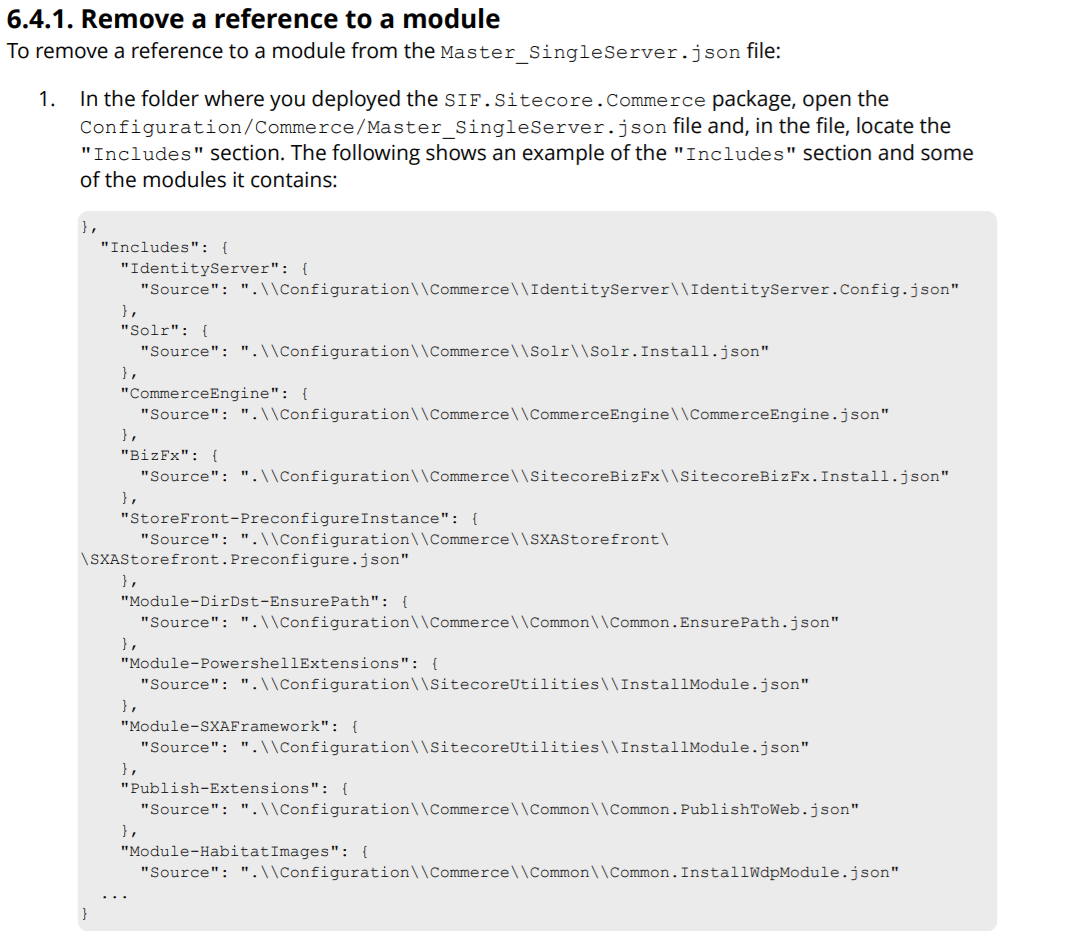
- open raw and then copy / paste Master_SingleServer.json into D:\sc1010_com_install\SIF\Configuration\Commerce
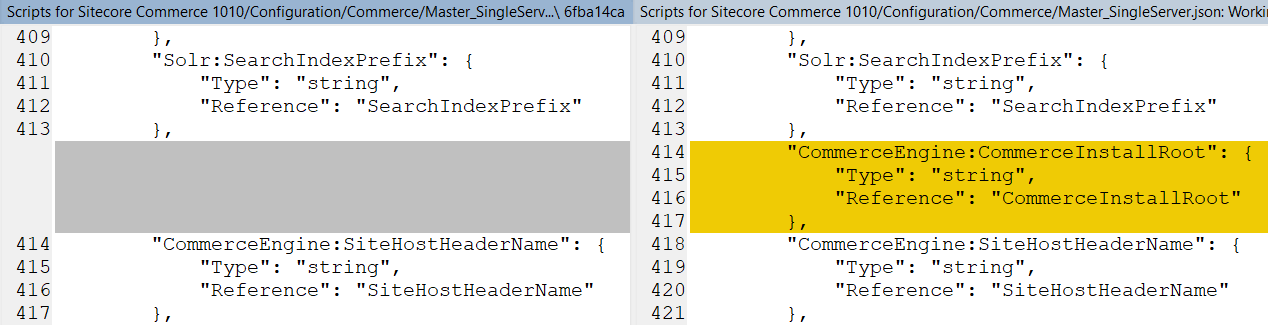
- open raw and then copy paste CommerceEngine.json into D:\sc1010_com_install\SIF\Configuration\Commerce\CommerceEngine
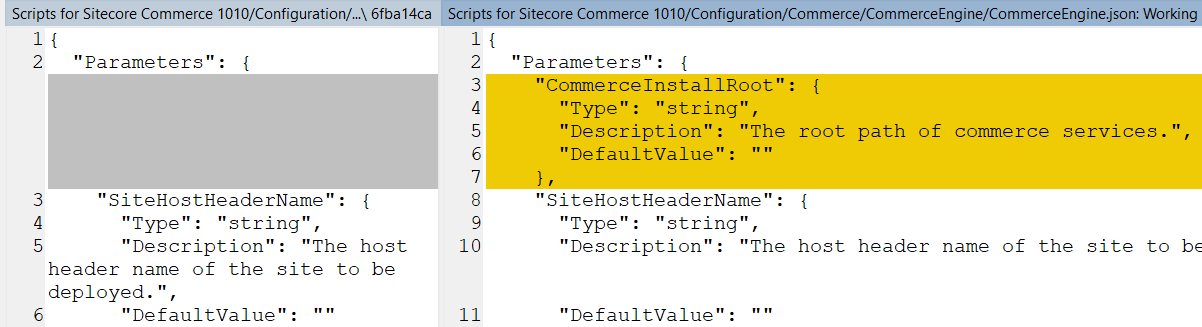
- open raw and then copy / paste CommerceEngine.Instance.Deploy.json into D:\sc1010_com_install\SIF\Configuration\Commerce\CommerceEngine
- (optional) download + unzip Configuration.zip and then copy / paste all to D:\sc1010_com_install\SIF
- download sc1010_com_install.ps1 and put it into D:\sc1010_com_install\SIF then open it to correct the following parameters if necessary
- $ScInstallDirectory
- $SiteNamePrefix
- $SiteHostHeaderName
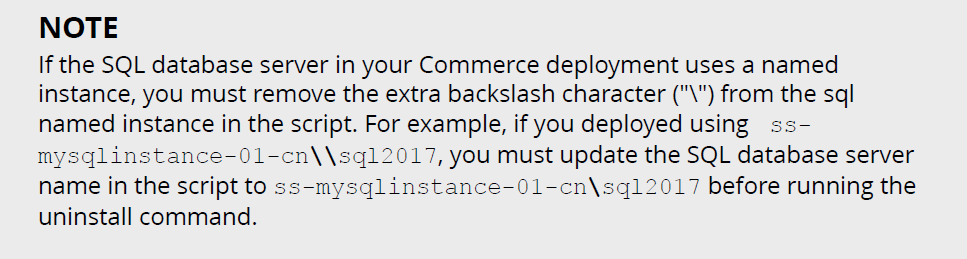
- $SitecoreDbServer
- ensure using double-backslash if any

- $SqlUser
- $SqlPass
- $SolrUrl
- $SolrRoot
- $SolrService
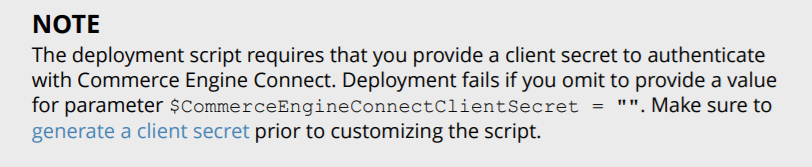
- $CommerceEngineConnectClientSecret: refer to Step 13 below
- deployment fails if you don’t provide a qualified value for this parameter
- (optional) create a secret client certificate
- refer to 2.3. Create a secret client certificate (Page 12) in XC Installation Guide for On Premises Solutions
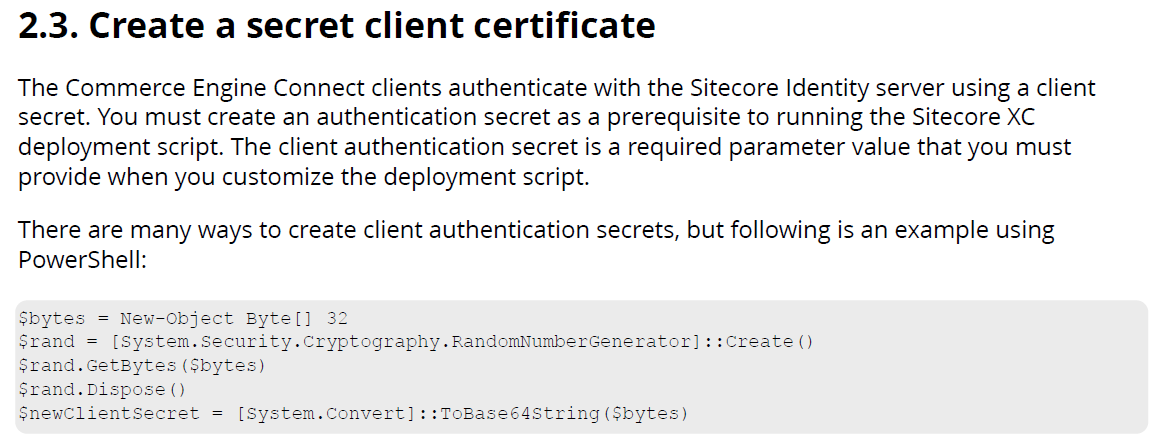
- Note: you can download the PowerShell script above here and then
- open Windows PowerShell
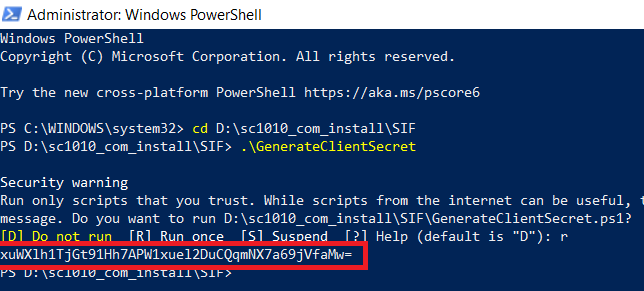
- note the generated client script and then replace the value of $CommerceEngineConnectClientSecret

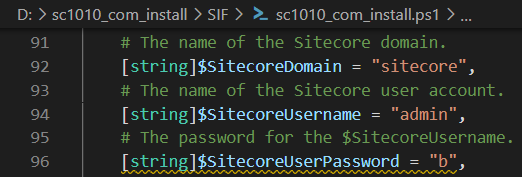
- (optional) correct the SitecoreUserName and SitecoreUserPassword of your Sitecore XP 10.1.0 instance if you’re using others rather than the default ones
- (optional) you can specify any local account (note: it will be created automatically if non-existent) to be set up for the various application pools that are created as part of the deployment
- let’s install it
- Note: ensure that there is NO custom AllowedCorsOriginsGroup in D:\sc1010_com_install\SIF\IdentityServerSitecore.Commerce.IdentityServer.Host.xml (they’re added automatically in prior installations) by reverting Sitecore.Commerce.IdentityServer.Host.xml
- launch PowerShell as an administrator
- change directory to D:\sc1010_com_install\SIF
- execute .\sc1010_com_install
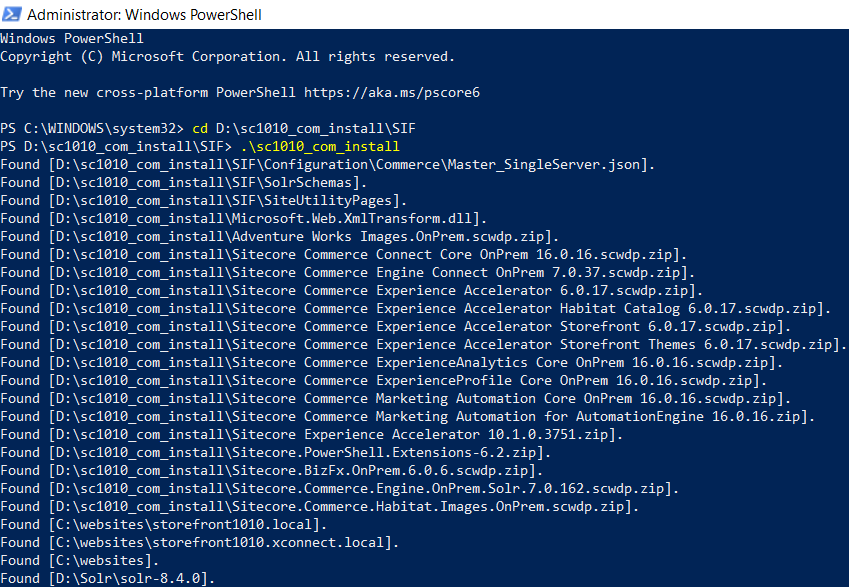
- hopefully there is nothing can stop the installation process now
- open a browser then navigate to https://storefront1010.local/, you would see the default page of Sitecore website. That’s because we don’t use the default host name sxa.storefront.com so we need to correct it via Sitecore
- log into https://storefront1010.local/sitecore/
- access SXA Site Manager application
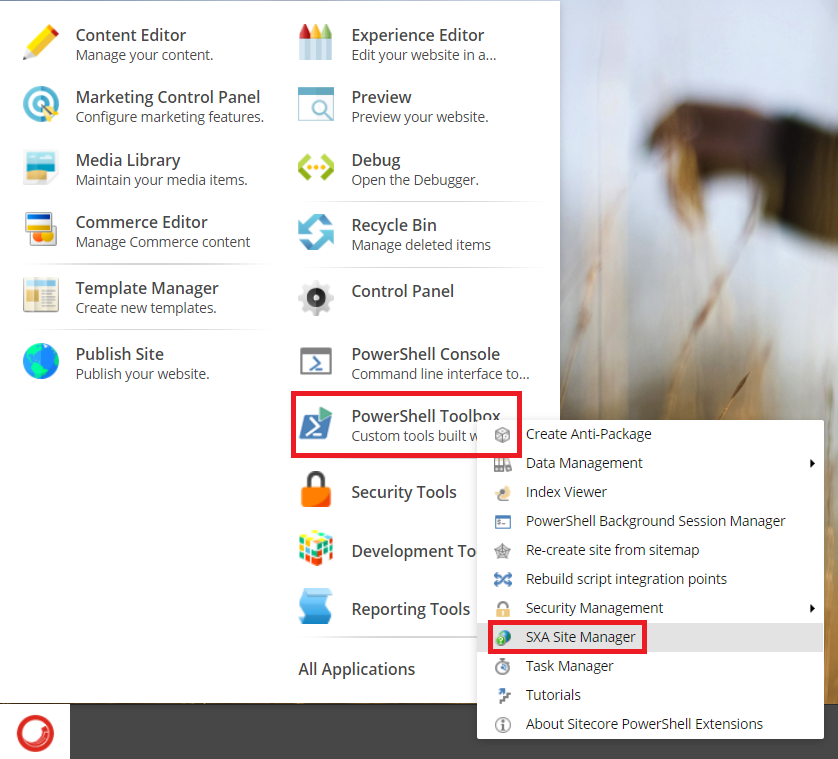
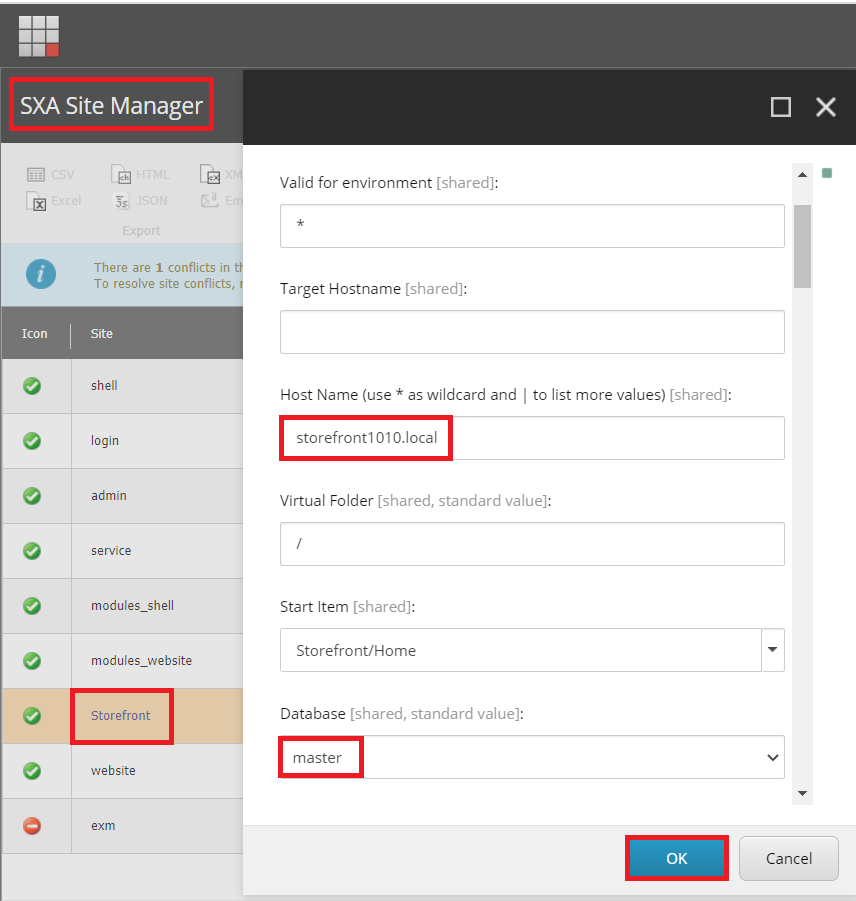
- open Storefront site and then update Host Name to storefront1010.local and Database to master
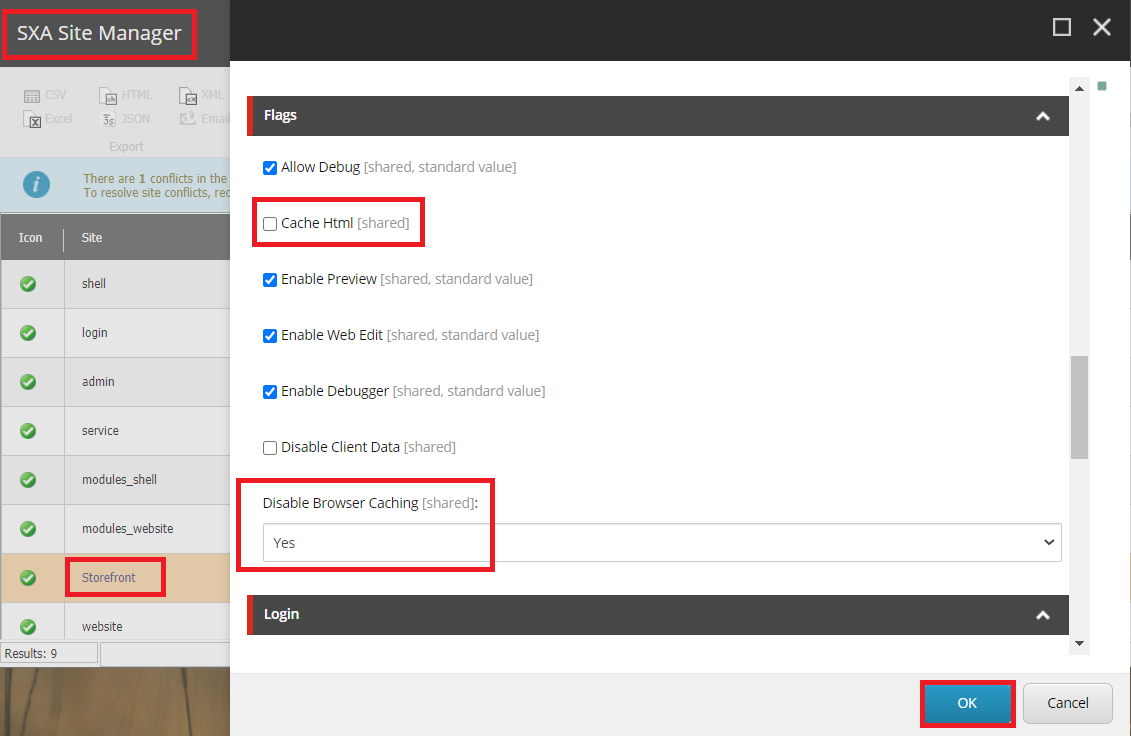
- (optional) uncheck the checkbox Cache Html and select Yes for Disable Browser Caching for a better practice
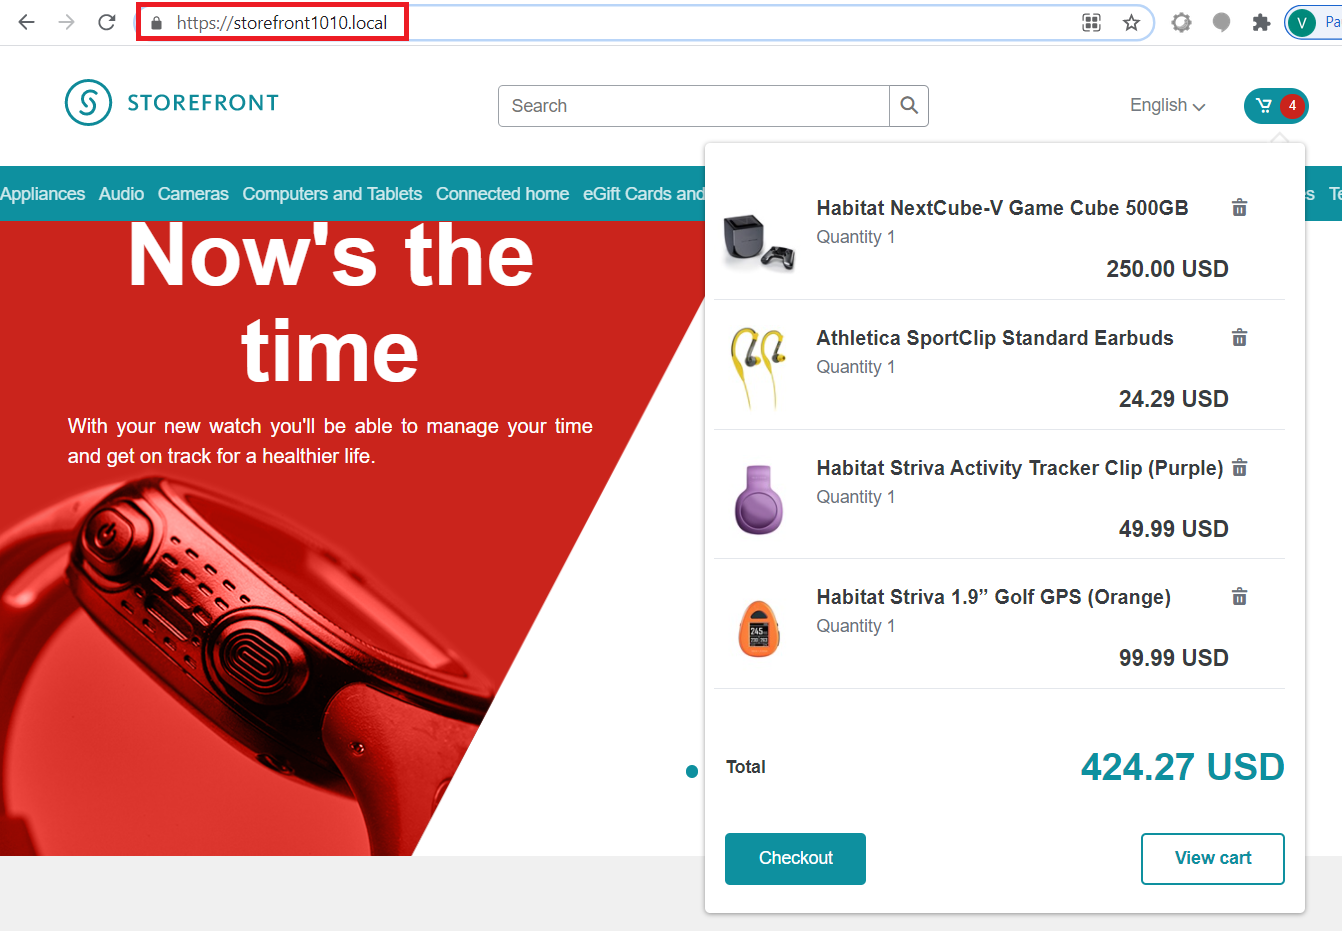
- refresh https://storefront1010.local/ and then add some products, you would see something like this
- DO NOT forget to perform Post-Installation Steps
- follow Post-Installation Steps (from Page 17) in XC Installation Guide for On Premises Solutions

The recommendation
We can remove the modules completed from D:s\c1010_com_install\SIF\Configuration\Commerce\Master_SingleServer.json and re-do Step 16 if there is something wrong (especially for Note: some known issues below) so that we are able to save a lot of time
Likewise the following one in the installation guide:
How to uninstall it?
- open D:\sc1010_com_install\SIF\sc1010_com_install.ps1 and uncomment the line 301 + comment out the line 298 then save it

- Note: DO NOT FORGET to restore D:\sc1010_com_install\SIF\Configuration\Commerce\Master_SingleServer.json if you already edited it for removing the modules completed via the install operations
- open Windows PowerShell (run as administrator)
- change directory to D:\sc1010_com_install\SIF
- execute .\sc1010_com_install
- hopefully, it runs well and cleans everything up
Note: some known issues
- ScriptHalted
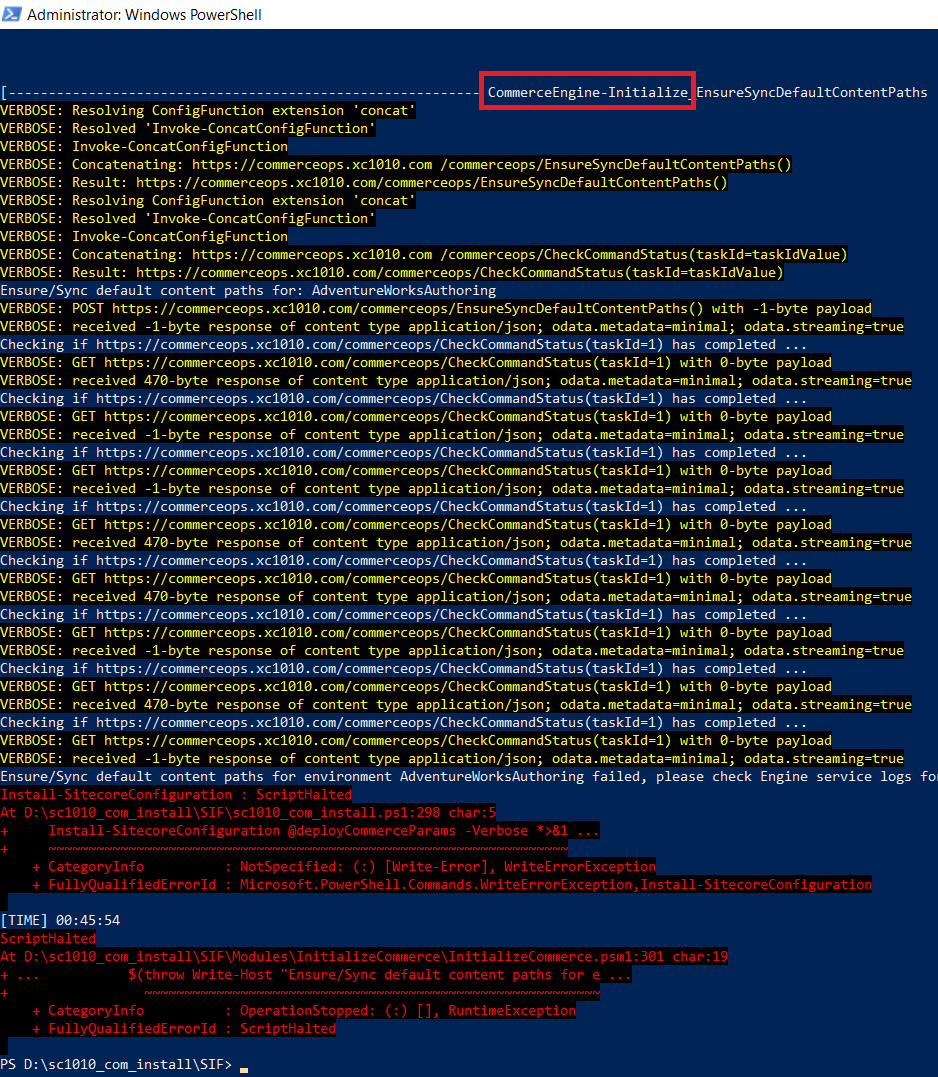
- my suggestion is to remove all prior modules completed + CommerceEngine-Initialize task itself (in this case) from D:\sc1010_com_install\SIF\Configuration\Commerce\Master_SingleServer.json and re-do Step 16
Got issues?
Please send your issues (with screenshots if possible) to viet.hoang.sitecore@gmail.com so that I have a chance to understand your problem and be able to suggest the solution.
Happy Sitecore Commerce 10.1 Installation!
This article originally appeared on Walking on clouds.