This one is a summary of my own experience for Sitecore Commerce 9 Initial Release (aka Sitecore XC 9.0.0) installation on my machine. I’ve had quite much experience in Sitecore 9 installation so I decided to go only with:
- Installation Guide – On Premises (Thanks Sitecore team!)
However, that’s really another story because there were some issues which I could not solve quickly by myself. These ones are so helpful for me (thank you, guys):
- https://naveed-ahmad.com/2018/02/25/sitecore-experience-commerce-xc9-troubleshooting-your-installation/
- https://www.linkedin.com/pulse/installing-sitecore-xc-90-kautilya-prasad/
- https://medium.com/redhotminute-australia/sitecore-9-commerce-install-and-sql-2017-db06215487bf
I do hope that this blog post is helpful for your own journey as well.
Update 1 (24-Mar-2018): you can play with Sitecore Commerce 9 Update 1 as well
Update 2 (15-Jul-2018): you can play with Sitecore Commerce 9 Update 2 as well
Update 3 (10-Dec-2018): you can play with Sitecore Commerce 9 Update 3 as well
Setup Prerequisites
Please refer to the Sitecore Experience Commerce 9 Compatibility Table for the software and version prerequisites:
- Windows 10
- Sitecore Experience Platform 9.0 Update 1
- Sitecore Experience Accelerator 1.6 (Note: must log into https://dev.sitecore.net/ before downloading)
- Sitecore Powershell Extensions 4.7.2
- .NET Core SDK 2.0.0
- .NET Core Windows Server Hosting 2.0.0
- Packages for On Premises 2018.01-2.0.254 (Note: must log into https://dev.sitecore.net/ before downloading)
Step-by-step guide
- install the ones below if not yet 😀
- a fresh Sitecore 9.0 Update 1 instance , let’s say sc9com.local and sc9com.xconnect.local (xConnect site)
- .NET Core SDK 2.0.0
- .NET Core Windows Server Hosting 2.0.0
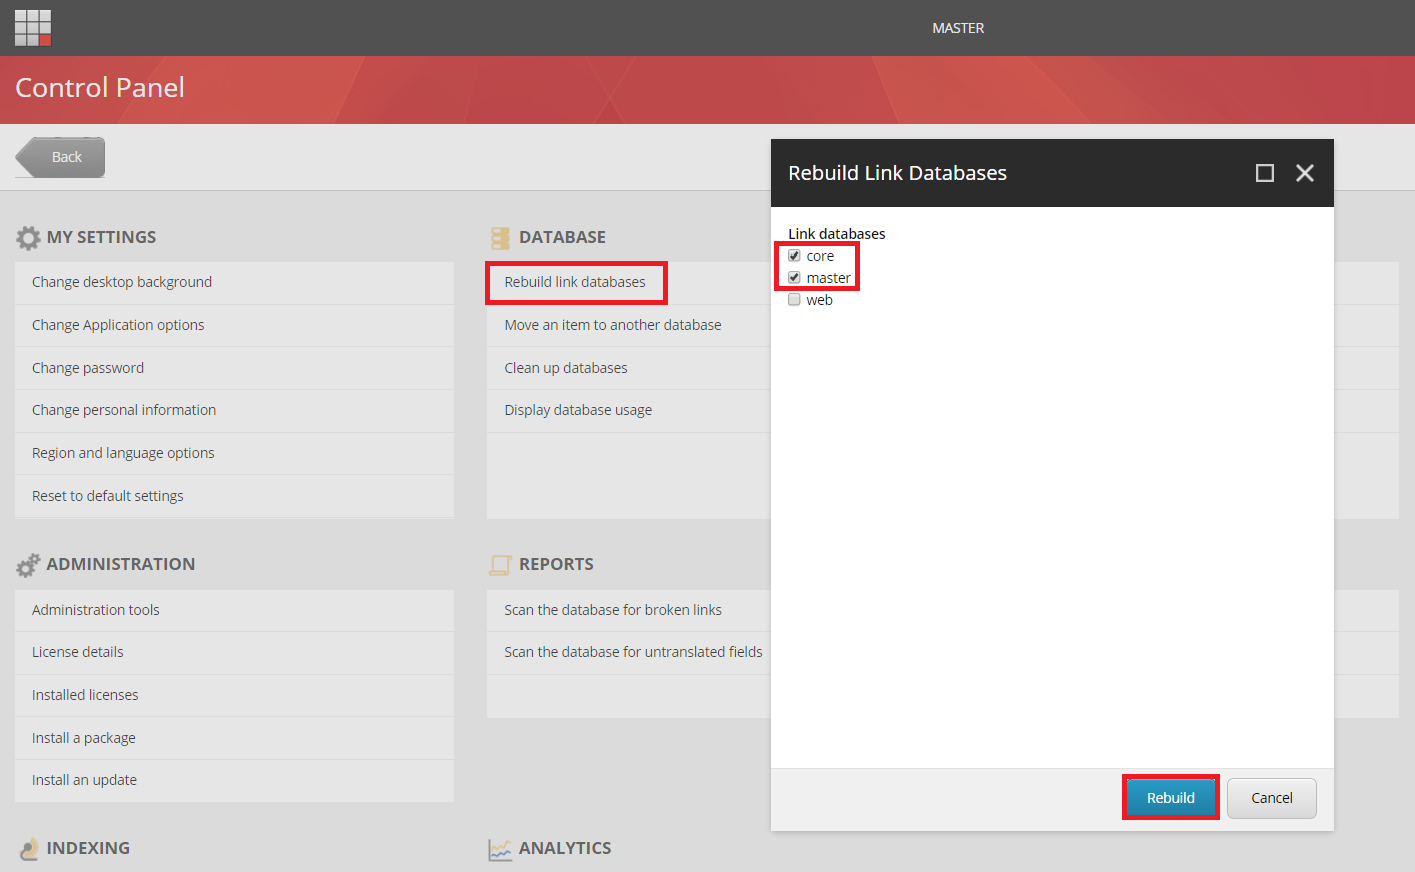
- rebuild the Link databases for the master and core databases if not yet:
- on the Sitecore Launchpad, click Control Panel, and in the Database section, click Rebuild Link Databases
- select the master and core databases and then click Rebuild
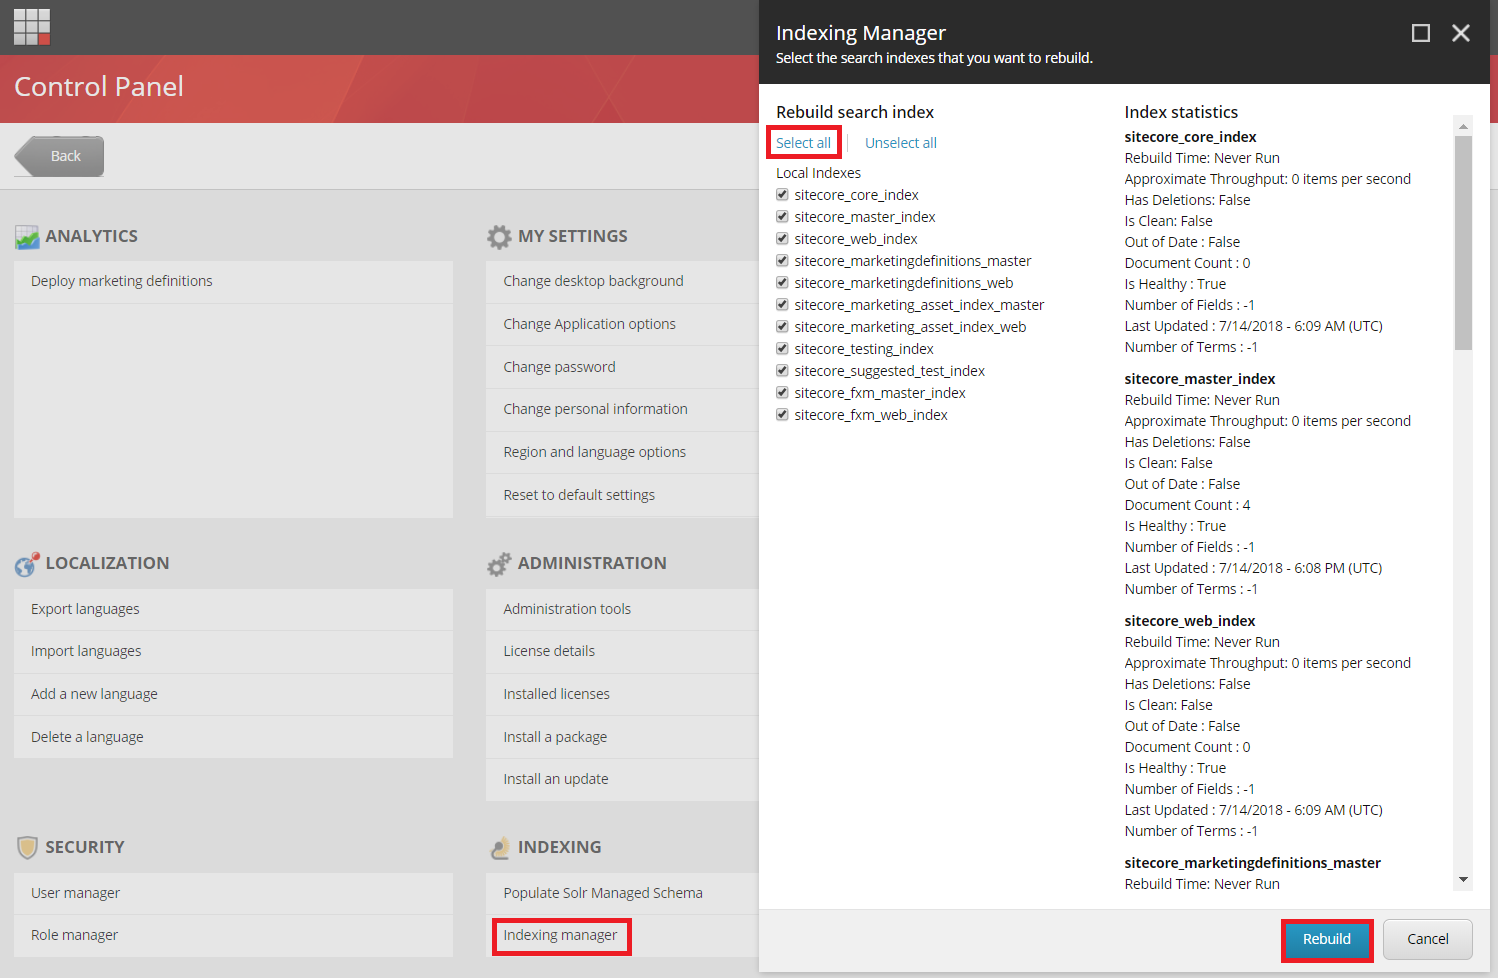
- rebuild the search indexes if not yet:
- on the Sitecore Launchpad, click Control Panel, and in the Indexing section, click Indexing manager
- in the Indexing Manager dialog box, click Select all, and then click Rebuild
- stop the xConnect site sc9com.xconnect.local
- create a new folder E:\sc9_com_install
- create a certificate for the Sitecore Commerce Engine Connect to authenticate with the Sitecore XC Engine:
- launch PowerShell as an administrator
- create the certificate by running the following cmdlet:
- New-SelfSignedCertificate -certstorelocation cert:\localmachine\my -dnsname “storefront.local”
- export the certificate to a file by running the following cmdlet:
- Export-Certificate -Cert cert:\localMachine\my\<Thumbprint-of-cert> -FilePath E:\sc9_com_install\storefront.local.cer

- download MSBuild Microsoft Visual Studio Web targets (available from Nuget) then extract the Web targets package, copy the \tools\VSToolsPath\Web\Microsoft.Web.XmlTransform.dll file into E:\sc9_com_install
- download Sitecore Experience Accelerator 1.6 (Note: must log into https://dev.sitecore.net/ before downloading) and put it into E:\sc9_com_install
- download Sitecore Powershell Extensions 4.7.2 then put it into E:\sc9_com_install
- download and unzip Packages for On Premises 2018.01-2.0.254 (Note: must log into https://dev.sitecore.net/ before downloading)
- unzip E:\sc9_com_install\SIF.Sitecore.Commerce.1.0.1748.zip and then rename E:\sc9_com_install\SIF.Sitecore.Commerce.1.0.1748 to E:\sc9_com_install\SIF for a better practice
- unzip the E:\sc9_com_install\Sitecore.BizFX.1.0.572.zip
- unzip the E:\sc9_com_install\Sitecore.Commerce.Engine.SDK.2.0.1922.zip file then copy the E:\sc9_com_install\Sitecore.Commerce.Engine.SDK.2.0.1922\Sitecore.Commerce.Engine.DB.dacpac file into E:\sc9_com_install
- unzip E:\sc9_com_install\Sitecore.Commerce.Engine.2.0.1922.zip
- open E:\sc9_com_install\Sitecore.Commerce.Engine.2.0.1922\wwwroot\bootstrap\Global.json
- replace the Database‘s value to SitecoreCommerce9_Global at line 93 (the default value
SitecoreCommerce_Globalis NOT correct) 
- zip the folder E:\sc9_com_install\Sitecore.Commerce.Engine.2.0.1922 as E:\sc9_com_install\Sitecore.Commerce.Engine.2.0.1922\Sitecore.Commerce.Engine.2.0.1922.zip file then overwrite E:\sc9_com_install\Sitecore.Commerce.Engine.2.0.1922.zip with it
- download sc9_com_install.ps1 and put it into E:\sc9_com_install\SIF then open it to correct 09 parameters below:
- $SiteName
- $ScInstallDirectory
- $SiteHostHeaderName
- $SqlServer
- $SqlDbPrefix
- $CommerceEngineCertificatePath
- $SolrUrl
- $SolrRoot
- $SolrService
- (optional): you can specify any local account (note: it will be created automatically if non-existent) to be set up for the various application pools that are created as part of the deployment at line 69-70 of sc9_com_install.ps1
- (optional): if you play with SQL Server 2017, you will have to download DeployCommerceDatabase.psm1 then overwrite E:\sc9_com_install\SIF\Modules\DeployCommerceDatabase\DeployCommerceDatabase.psm1
- (optional): if you have multiple instances of SQL Server on your machine, you will have to:
- unzip E:\sc9_com_install\Sitecore.Commerce.Engine.2.0.1922.zip
- open E:\sc9_com_install\Sitecore.Commerce.Engine.2.0.1922\wwwroot\bootstrap\Global.json
- replace the Server‘s value to your SQL Server instance at line 48 and line 97


- open E:\sc9_com_install\Sitecore.Commerce.Engine.2.0.1922\wwwroot\data\Environments\Plugin.SQL.PolicySet-1.0.0.json then replace the Server‘s value to your SQL Server instance at line 15
- open E:\sc9_com_install\Sitecore.Commerce.Engine.2.0.1922\wwwroot\data\Environments\PlugIn.Habitat.CommerceAuthoring-1.0.0.json then replace the Server‘s value to your SQL Server instance at line 102
- open E:\sc9_com_install\Sitecore.Commerce.Engine.2.0.1922\wwwroot\data\Environments\PlugIn.AdventureWorks.CommerceAuthoring-1.0.0.json then replace the Server‘s value to your SQL Server instance at line 102
- zip the folder E:\sc9_com_install\Sitecore.Commerce.Engine.2.0.1922 as E:\sc9_com_install\Sitecore.Commerce.Engine.2.0.1922\Sitecore.Commerce.Engine.2.0.1922.zip file then overwrite E:\sc9_com_install\Sitecore.Commerce.Engine.2.0.1922.zip with it
- (optional): again, if you have multiple instances of SQL Server on your machine, you will have to:
- unzip E:\sc9_com_install\Sitecore.IdentityServer.1.0.65.zip
- open E:\sc9_com_install\Sitecore.IdentityServer.1.0.65\wwwroot\appsettings.json, replace the Data Source‘s value to your SQL Server instance at line 4

- (optional): you may get timeout exceptions (some tasks’ execution timeout is only 12 minutes by default and the remote query timeout of SQL Server is only 10 minutes by default) so I suggest:
- download SitecoreUtilityTasks.psm1 then overwrite E:\sc9_com_install\SIF\Modules\SitecoreUtilityTasks\SitecoreUtilityTasks.psm1 in order to increase the execution timeout
- download PerformanceTweak.config then put it into \sc901com.local\App_Config\Environment in order to turn all Sitecore jobs off and disable xDB for a better installation (you know, it’s a super long operation :D)
- configure the remote query timeout option of SQL Server:
- using SQL Server Management Studio
- in Object Explorer, right-click a server and select Properties
- under Remote server connections, in the Remote query timeout box, type or select a value from 0 through 2,147,483,647 to set the maximum number seconds for SQL Server to wait before timing out
- consider to put $global:ProgressPreference = ‘silentlyContinue’ into the sc9_com_install.ps1 in order to speed up the operation
- launch PowerShell as an administrator

- hopefully there is nothing can stop the installation process now
- open a browser then navigate to storefront.local/, you would see the default page of Sitecore website. That’s because we don’t use the default host name sxa.storefront.com so we need to correct it inside Sitecore
- log into sc9com.local/sitecore/
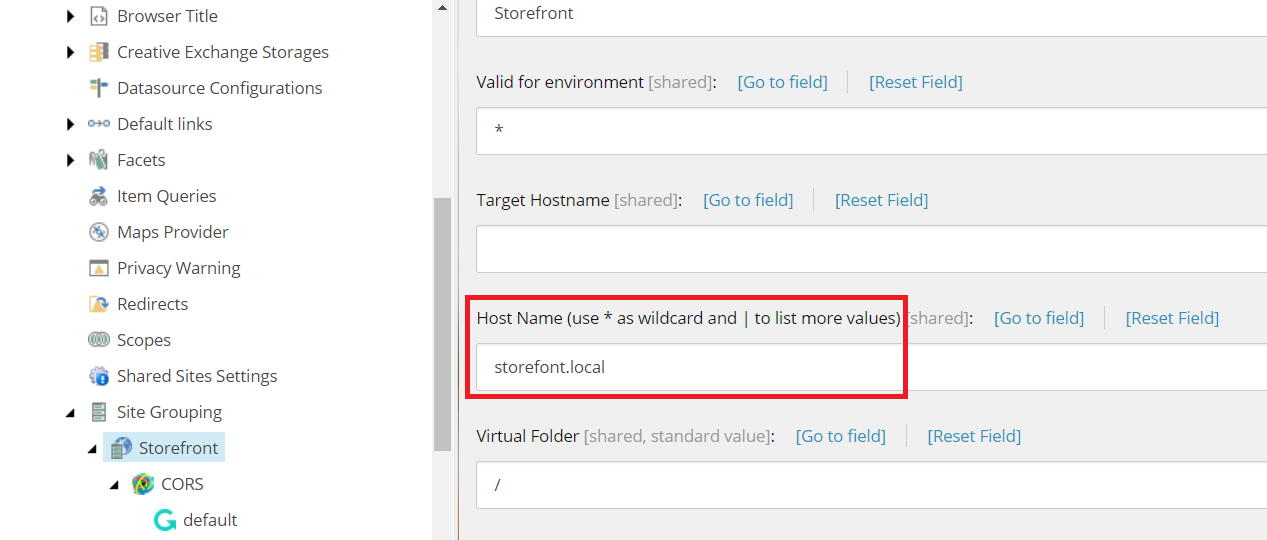
- access /sitecore/content/Sitecore/Storefront/Settings/Site Grouping/Storefront
- update Host Name to storefront.local then publish
- refresh storefront.local/, you would see something like this
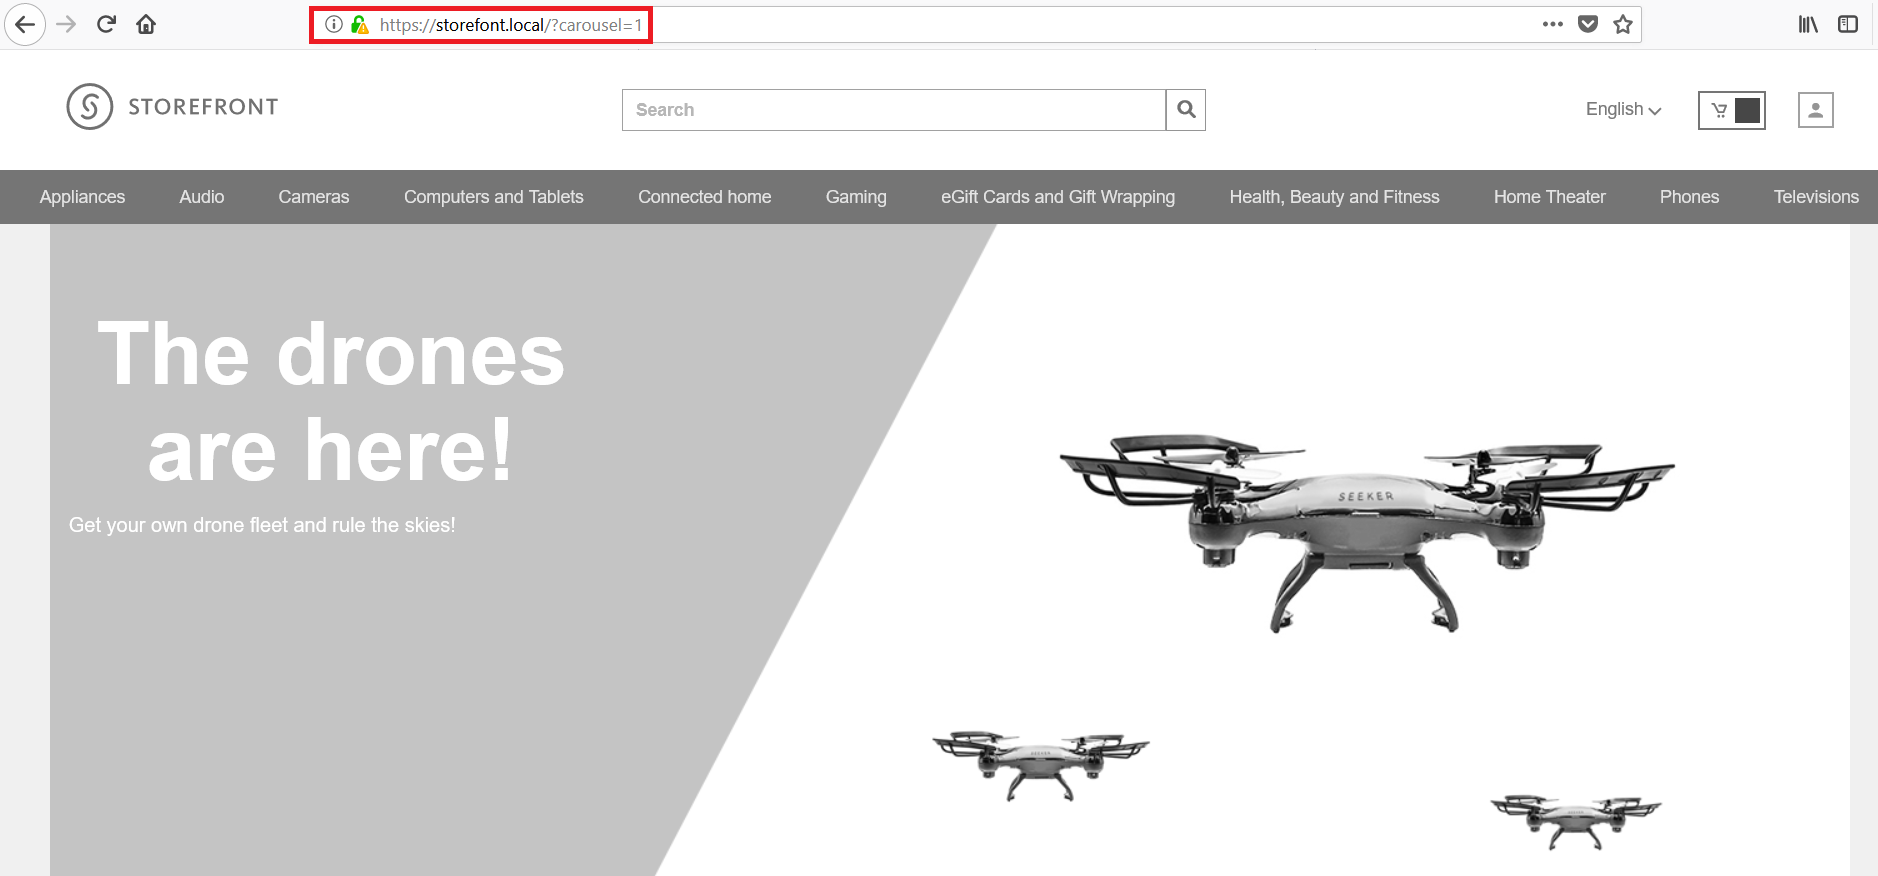
- I’m sure that you want to make it more fancy so access /sitecore/content/Sitecore/Storefront/Presentation/Page Designs
- update Theme to Storefont Branded then publish

- refresh storefront.local/, you would see something like this

- DO NOT forget to perform Post-Installation Steps
- remove \sc901com.local\App_Config\Environment\PerformanceTweak.config if existent
- follow Chapter 4 Post-Installation Steps (Page 19 – 23) in Sitecore Commerce 9 Installation Guide
The recommendations
- we can remove the tasks completed from E:\sc9_com_install\SIF\Configuration\Commerce\Master_SingleServer.json and re-do Step 21 if there is something wrong (especially for Note: some known issues below) so that we are able to save a lot of time 😀
- if there is something wrong during installation process, we always have a chance to correct it via json files (note: need to do IIS reset after updating):
- C:\inetpub\wwwroot\SitecoreIdentityServer\wwwroot\appsettings.json
- C:\inetpub\wwwroot\CommerceShops_Sc9\wwwroot\bootstrap\Global.json
- C:\inetpub\wwwroot\CommerceOps_Sc9\wwwroot\bootstrap\Global.json
- C:\inetpub\wwwroot\CommerceMinions_Sc9\wwwroot\bootstrap\Global.json
- C:\inetpub\wwwroot\CommerceAuthoring_Sc9\wwwroot\bootstrap\Global.json
- C:\inetpub\wwwroot\CommerceShops_Sc9\wwwroot\data\Environments\Plugin.SQL.PolicySet-1.0.0.json
- C:\inetpub\wwwroot\CommerceShops_Sc9\wwwroot\data\Environments\PlugIn.Habitat.CommerceAuthoring-1.0.0.json
- C:\inetpub\wwwroot\CommerceShops_Sc9\wwwroot\data\Environments\PlugIn.AdventureWorks.CommerceAuthoring-1.0.0.json
How to uninstall it?
- download sc9_com_uninstall.ps1 (the original one is here – thanks Naveed Admad) and put it into E:\sc9_com_install then open it to correct 12 parameters below:
- $Prefix
- $CommerceOpsSiteName
- $CommerceShopsSiteName
- $CommerceAuthoringSiteName
- $CommerceMinionsSiteName
- $SitecoreBizFxSiteName
- $SitecoreIdentityServerSiteName
- $SolrService
- $PathToSolr
- $SqlServer
- $SqlAccount
- $SqlPassword
- launch PowerShell as an administrator
- hopefully, it runs well and cleans everything up
Note: some known issues
- The service cannot accept control messages at this time
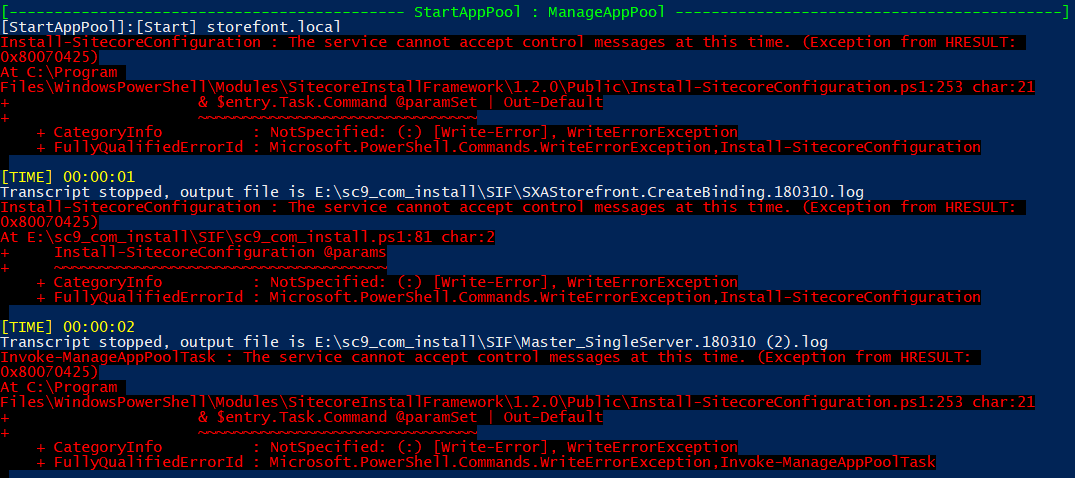
- access IIS, start sc9com.local site and sc9com.local application pool manually (note: you may need to do it several times) if they’re in STOP status, somehow IIS cannot restart those ones after stopping them
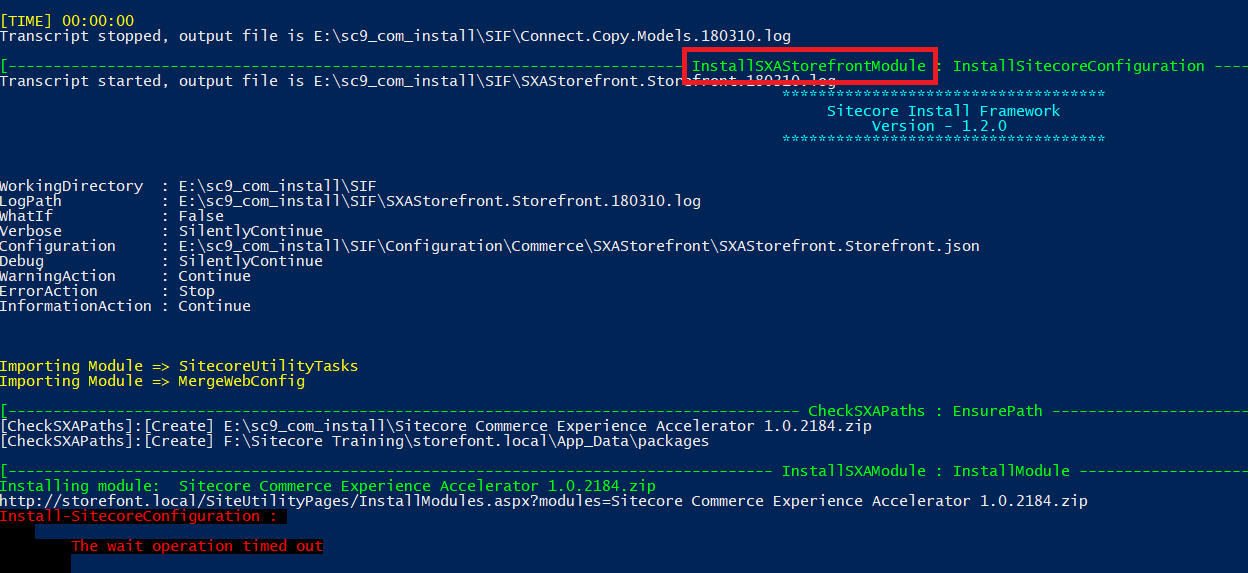
- The wait operation timed out: [SqlException (0x80131904): Connection Timeout Expired. The timeout period elapsed during the post-login phase. The connection could have timed out while waiting for server to complete the login process and
respond; Or it could have timed out while attempting to create multiple active connections.
- open E:\sc9_com_install\SIF\Configuration\Commerce\Master_SingleServer.json to remove the tasks completed
- for instance, I would remove all the completed tasks before InstallSXAFrameworkModule then re-do Step 21 again
- Request timed out: Exception Details: System.Web.HttpException: Request timed out.
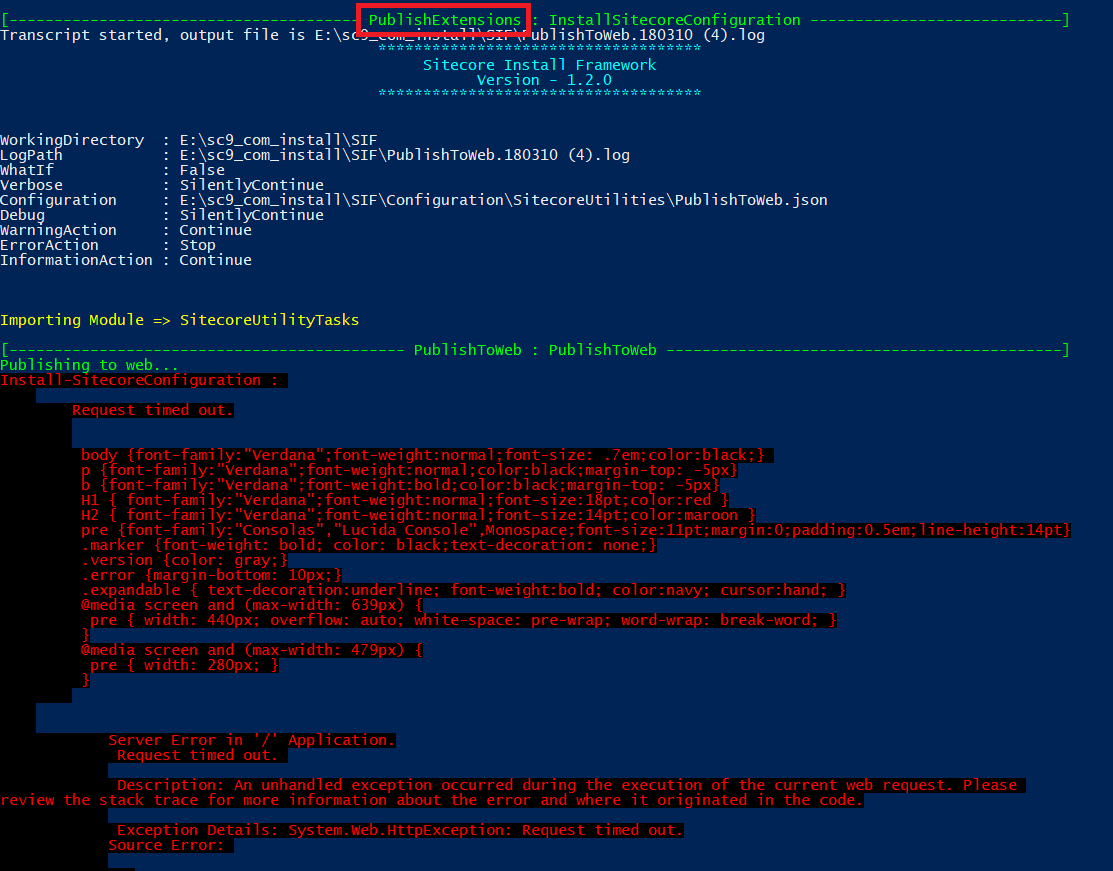
- my suggestions:
- open E:\sc9_com_install\SIF\Configuration\Commerce\Master_SingleServer.json to remove the tasks completed
- for instance, I would remove all the completed tasks before PublishExtensions then re-do Step 21 again
- consider to perform Step 20 as well if solution #1 does not work as expected then re-do Step 21 again
- open E:\sc9_com_install\SIF\Configuration\Commerce\Master_SingleServer.json to remove the tasks completed
- Get Token From Sitecore.IdentityServer: The remote server returned an error: (500) Internal Server Error

- open C:\inetpub\wwwroot\SitecoreIdentityServer\wwwroot\appsettings.json then ensure your connection string is correct (especially for the case you’re using your own SQL Server instance)

- Something went wrong restarting SQL server again: Cannot validate argument on parameter ‘InputObject’. The argument is null or empty. Provide an argument that is not null or empty, and then try the command again.

- somehow SQL Server window service cannot restart after stopping, ensure SQL Server window service is running
Got issues?
Please send your issues (with screenshots if possible) to [email protected] so that I have a chance to understand your problem and be able to suggest the solution.


